


This week has pretty much been working with a few crafts sprinkled in between. I was able to do crafty things and hang out with my friends Lauren and Chanel. Those awesome projects are coming soon to the blog nearest you! (aka Elemental Carbon). I also went to Bible Study on Tuesday, Women's Bible Study Wednesday morning, and a RealLife get together playing sand volleyball on Thursday.
I also picked up my guitar again because it had been way way too long. I learned to play the song Safe & Sound by Taylor Swift because I think the intro is really fun. I also worked a little bit on Study No. 7 in Am by Matteo Carcassi which I had learned previous to my guitar hiatus (due to college busy-ness).
When I was younger, and even now, it seemed like every single person and their brother had one of those no-sew fleece blankets where you tied the edges, but I never got or made one. I was at Hobby Lobby with my friend Lauren and saw this really cute black and white plaid fleece (and it was on sale!) and knew that this was the perfect opportunity to make up for the missing fleece blanket in my childhood.
Plus, I love blankets and I feel like you can never have too many.
At the same time, I was never overly fond of the tied edge look, but as much as I love sewing, I still jump at the chance of anything that is no-sew.
So instead of tying the edges, I crocheted them so that they look braided!

Want to know how? I'll show you!
Here's what you'll need:
-One or two colors of fleece (about two yards makes a pretty big blanket)
-Scissors
Here's what you do:
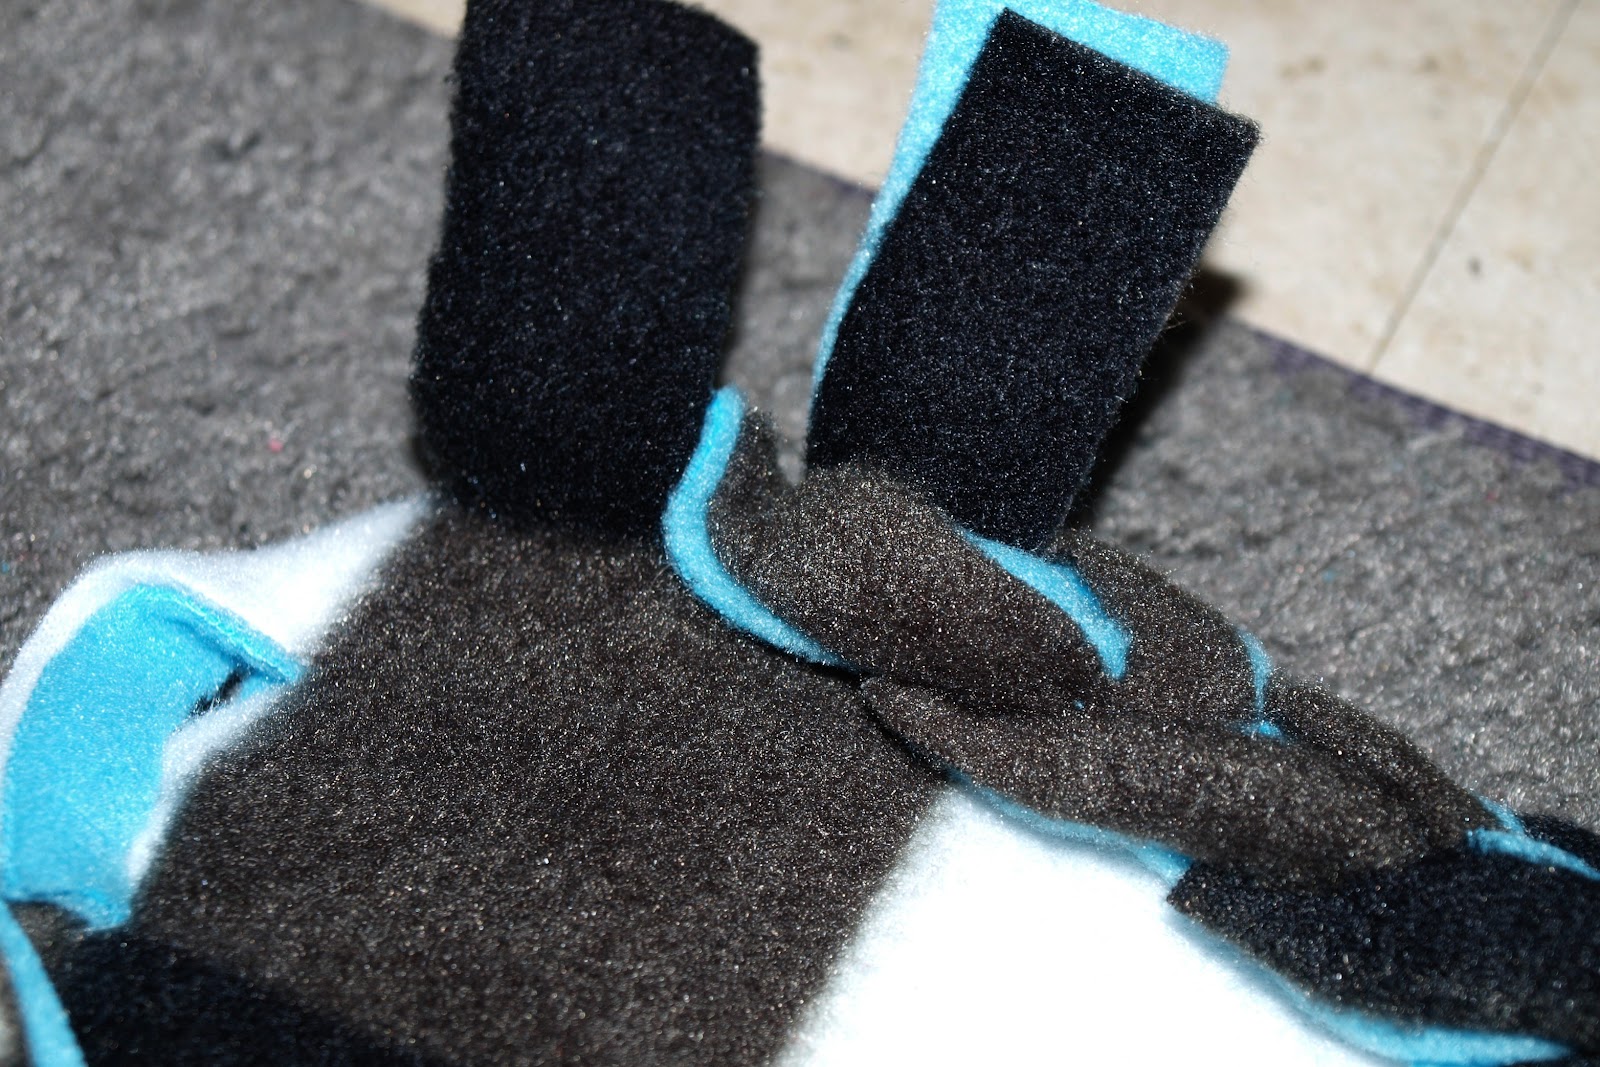
1. Lay the two large pieces of fleece on top of one another, right sides facing out (if there are right sides). Cut the raw edges off and trim them down so that they are both the exact same size.

2. Cut strips about two inches in length all the way around the edges of the blanket. Cut out squares in the corners. The plaid made it really easy to keep these straight! Then, fold the strips over and cut 1-1 1/2 inch slits in each strip. DON'T cut slits in the last two strips of the corner you will be doing last - these will be used for tying up the end.

The slits don't have to be perfectly straight because you won't really see them anyways.
3. Start at one corner and open up the slit, pulling the next strip all the way through. Once you have pulled that strip through, open up that slit and pull the next strip through and so forth.


Continue the same process going around the corners.

4. Once you reach the end, pull the second to last strip (the last two shouldn't have slits) through and then tie the second to last strip and the last strip together. Then, tuck the ends into the edge.

And you're done!


If you aren't an official member/follower of my blog yet and you have a google, yahoo, or twitter account, sign in and join my site! I'd love to have you following along!
________________________________________________________________________
"So we do not lose heart. Though our outer self is wasting away, our inner self is being renewed day by day. For this light momentary affliction is preparing us for an eternal weight of glory beyond all comparison, as we look not to the things that are seen but to the things that are unseen. For the things that are seen are transient, but the things that are unseen are eternal."
-2 Corinthians 4:16-18
Pin It
Hi! love the idea, I want to do this for my friends and family for the holidays but I have a question, do the edges stay as they are or do some of them get pulled out from the slits sometimes, like in the washing machine? thanks!
ReplyDeleteHello! Thanks for your question. I haven't washed mine yet, but I haven't had any problems with the slits pulling out. Because you pull one through the other through the other until the ends and then you tie the very end, it isn't in any danger of unraveling. The only problem might be if you made your slits too close to the edge and you rip the fabric. I think that would be pretty unlikely, though. Mine has held up really well!
DeleteThanks for stopping by!
Alyssa
Hi Alyssa, really like how your blanket came out. You mentioned strips are two inchs in length but I was wondering how wide is each strip and also what was the size of the squares you cut out of the corners? Thank you.
ReplyDeleteThanks for the question! The strips are about two inches long and an inch to an inch and a half wide, although it doesn't have to be exact by any means. I didn't even measure, I just started cutting and eyeballed it. The squares in the corners were about 2 inches by 2 inches (however long you make your strips should be the width and length of the corner squares!)
DeleteHope this helps!
Be sure to let me know how it turns out if you decide to try it! :)
Alyssa
This is really cute! And I already bought mu fleece to start but I have a question..about how long does the crochet edg take to complete? I have a couple o want to do and want to know how much time to set aside. thanks!
ReplyDeleteI'm so glad you like it and you have decided to try it! It is truly one of the easiest projects I have ever done. It took me no more than an hour including all of the cutting and "crocheting" so it is definitely a project that can be done in part of an afternoon. You'll have to let me know how it turns out!
DeleteThanks for dropping by.
Alyssa
Hey. I made one of these blankets yesterday. I did the two layer. I just wanted to let you know I found an alternative way to finish instead of tying a knot in the last two strips. I followed all of the same steps, but when I got to the last strip, I pulled it through the previous strips as all the others, but then I cut it (so the ends were free) and tied it around the strip that I started with. I'm not sure if that makes sense. I decided to do that so that it looked completely uniform. Since it still has a knot, it's still secure. I tucked the ends (which were very small) into the "braid". It worked really well. Just thought I would let you know so that maybe you could try it.
ReplyDeleteThank you for letting me know about your method! Next time I make one of these, I'll definitely try it out.
DeleteThanks for stopping by :)
Alyssa
Ok so I just did this on my sons blanket! The braided part looks great, but the corners are all bunched together! do you know what i did wrong?
ReplyDeleteHi April! Thanks for your question. Sorry it took me so long to get back to you on this!
DeleteA few suggestions to make the corners less bunchy:
-Make the strips a little longer in length. I didn't realize this when I first made this blanket/wrote this tutorial, but since making a few more of these, I have discovered that the longer the strip length (don't go extreme like 5+ inches or else it looks bad), the less bunchy/more flat the blanket will lay.
-Make the slits within your strips (the ones you are "braiding" through) longer as you make your strip length longer. The larger the slit size, the more breathing room you give the strips as well.
Let me know if this helps/you need more clarification! It's one of those things that is difficult to explain in text.
Thanks for stopping by Elemental Carbon!
Alyssa
Just saw your post this morning and finish my first one this afternoon it is gorgeous my granddaughter will love it will make the perfect Christmas gift
ReplyDeleteI just did this tonight to see if I could do it. I want to do this as Christmas presents for a few of my bridesmaids (they are superhero fans so I am doing huge superhero ones). It tuned out wonderfully and I would love to link this in my blog! I do hope it is alright.
ReplyDeleteI'm glad you're putting this tutorial to good use!
DeleteIt's perfectly fine if you put this on your blog, just make sure to credit me/put the proper links back to my site :)
Thanks for stopping by!
Alyssa
Would this work with other fabrics besides fleece?
ReplyDeleteI don't think this would work with other fabrics for a few reasons:
Delete-other fabrics fray, fleece does not
-other fabrics will probably bunch tighter/curl weird at the parts where you braid it, but fleece lays quite nicely for this.
Let me know how it goes if you try it out with different fabrics, though! Thanks for stopping by.
Alyssa
This would work with felted wool (not wool felt) because it doesn't fray or ravel.
DeleteWhat's the best way to make sure the fabric is straight and all the same length? Would I need to use a yard stick? Or does it not matter that much if it's a little off-square?
ReplyDeleteHello! Thanks for your question. I have found that it really doesn't matter if it is a little off-square. The plaid pattern on the one I made here helped to keep it straight, but I have made multiple that have other crazy patterns. The best way is to make sure your original pieces of fabric have straight(ish) edges and then make all the strips a comparable length. I never measure and it usually works out just fine and looks good! Let me know if you have any other questions!
DeleteThanks for stopping by!
Alyssa
Tried it, loved it! Thank you for sharing :)
ReplyDeleteNot a problem! I'm glad you enjoyed it! Thanks for stopping by :)
DeleteAlyssa
this looks really awesome! I can't wait to try this when I get my second piece of fleece in the mail. Thanks for sharing.
ReplyDeletejust made this, and i absolutely love it!! i can't wait to make some for my friends and family! thanks!! :-)
ReplyDeleteI'm so glad you like it! Thanks for stopping by :)
DeleteAlyssa
I just made this----I LOVE the new twist on the classic tie blanket. Much more sophisticated. Thank you!!!
ReplyDeleteI also had the same problem that Aprill had back in September--that the blanket I finished has "pulled" corners. The rest looks great! What do you think I did wrong?
ReplyDeleteHi Jansa! I just now got back to April but I'll go ahead and copy and paste my suggestions for this problem here as well:
Delete-Make the strips a little longer in length. I didn't realize this when I first made this blanket/wrote this tutorial, but since making a few more of these, I have discovered that the longer the strip length (don't go extreme like 5+ inches or else it looks bad), the less bunchy/more flat the blanket will lay.
-Make the slits within your strips (the ones you are "braiding" through) longer as you make your strip length longer. The larger the slit size, the more breathing room you give the strips as well.
Let me know if this helps/you need more clarification! It's one of those things that is difficult to explain in text.
Thank you so much for stopping by Elemental Carbon! I appreciate your interest.
Alyssa
Thanks for this tutorial. Took about two hours start to finish and I have an awesome gift for a special little girl's 1st birthday! I really should have read the comments first since I have bunched corners too. Guess I'll just say the pockets are for keeping toes cozy! :)
ReplyDeleteI followed all of your instructions and I have my 2" corners out and 2 inches long about 1" apart and have started the "crocheting". Could you explain a bit more about cutting the strips longer to avoid bunching up at the corners? Do you mean the corner ones (like one before and one after the corner)? Also, how do I do that with my 2" square corner already cut out? Could you post some pictures? I am just on my first one; thank goodness I am not using my more expensive Frozen fleece!
ReplyDeleteHi Jen,
DeleteWith the 2" corners and strips, they should be long enough to not make the corners bunchy. Also as long as your slits in the middle of each strip aren't super teeny, that should also help. I wish I could take pictures, but unfortunately I don't have any of the supplies for this project at school with me. Let me know if you need further clarification on anything and I can do my best to try and explain it with words. I hope it works out for you!
There's also another blog post I have found since posting mine that does a similar technique for her fleece blankets, maybe checking hers out would help clarify more: http://www.piecesbypolly.com/2010/12/braided-fleece-blankets-tutorial.html
Thanks for stopping by,
Alyssa
I would love this in a video tutorial
ReplyDeleteHi Alyssa,
ReplyDeleteI have made probably 75 of the tie blankets (3 today), but I was told today about your way, I'm intrugued. Do you find that the "stretchy" sides should be done any differently or jsut easier since they do stretch. When I do the ties I cut those shorter so was curious.
Thanks!
Melody
Definitely could've used more photos. :(
ReplyDeleteI worked on my blanket for 2+ hours and have a bunched up mess.
I thought I read the directions well but ended up misinterpreting some major factors. I thought I had to cut out the corners like a regular tie blanket and realized when I was crocheting that I was very wrong. I'm trying to salvage by making slits and such longer but I'm not sure it's going to work yet or not :(
Hi This is gorgeous !!! I was just curious but is it two yards for each fabric ? im making baby blankets :) Thank you !
ReplyDeleteThank you for this! Making lap quilts for nursing home and this will wonderful. Love it because it looks so finished!
ReplyDeleteHow big is the whole blanket
ReplyDeleteGenius!!! I have arthritis and it's hard enough to cut let alone tying all those ends. I'll be doing this for the blankets I'm putting together for my grandkidlets.
ReplyDeleteHas anyone tried washing it? Just wondering how it will hold up in the washer. Thanks!! I absolutely love how easy it was!!!
ReplyDeleteHi! Im about to make one of these for a friend of mine. I want to make one side a camo / woodsy pattern and the other side white / off white. the camo/woodsy pattern I really like is 100 % polyester. Would it look good if one side was polyester and the other side was fleece?
ReplyDeleteFound your post online and loved the look. I tried it and found that the blanket would not lay flat. So I pulled out the finished section; then instead of crocheting both layers at once I alternated- top, bottom, top, bottom. The bonus is that the edge alternates the two fabrics. Lovely!
ReplyDeleteAlso.... I rounded the corners instead of squaring. When I finished, I split the last piece and then stitched it back together under the original one. (Hope that makes sense)
ReplyDeleteI really loved this pattern! Thank you so much for sharing. I found that long skinny strips with long slots looked the best. I also tugged on each one after I braided it through, so that it keeps the braid uniform and tight. :) Hoping it still stay for many years and washings. ;)
ReplyDeleteHas anyone got any ideas on how to make a creative blanket by tieing fabric together or any other way. I'm not much for sewing and would like to pass down my kids who are now grown themselves an heirloom of my own. Please let me know if u can help me be creative enough to pull this idea off.
ReplyDeleteI got a question about this.. I'm stuck on last step with then ends to each corner are u suppose to pull both colors through that slit then tie ? Then tuck ?
ReplyDeleteDo you have any problems curling? How did you flatten the edges?
ReplyDeletePlease help, I am confused! When we tuck the strips into the other strips are we tucking BOTH the top and bottom strip into the top and bottom strip of the next one or just the bottom piece into the top piece like this video? https://www.youtube.com/watch?v=hft7oRdmbwo
ReplyDeleteMy dad HATES the ties on blankets but wanted a Chicago Blackhawks blanket, I made him one doing this for his birthday and he loves it!! Thank you!
ReplyDeletedo you cut slits through both layers of fabric or just the top? Do you pull both both layers through together or do the top layer through the bottom layer and then that bottom layer through the next top strip?
ReplyDeleteWhat pattern is the grey black and white side? and where did you find it?!
ReplyDeleteThese are beautiful! I've been making the traditional tie no-sew blankets for rescue animals, but I've never been a big fan of those knots. Can't wait to try this version! Thanks so much for sharing!
ReplyDeleteI'm looking for Rugby (preferably Irish) Fleece fabric 2 1/2 yds long by 60" to make a blanket.?
ReplyDeleteAm trying to make a fleece blankets with all the ends tied together and need any info on where to find rugby fleece fabric (preferably with Irish colors) as soon as possible. Any help on where I can find this is greatly appreciated.
Truly Love it
ReplyDelete