Time for my second blog post ever...exciting stuff!
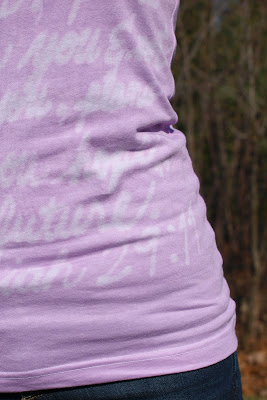
I'm back in Columbus and unfortunately, spring break is over. I was so productive with all of my crafty projects over spring break, I'm going to miss it now that I have to do homework instead! Being the first week of Spring Quarter 2012 here at Ohio State, I thought I'd share a tutorial to make an AWESOME t-shirt. It's an idea I saw a while ago on Pinterest and I thought I would give it a shot.
Cute, huh?
Click "Read More" below for instructions!
Here's what you'll need:
-Plain white t-shirt (At least 60% cotton is ideal, but I made a few with less percent than that and it still worked!)
-Elmer's Blue Gel glue (NOT the white stuff!)
-Elmer's Blue Gel glue (NOT the white stuff!)
-Fabric dye (I like Rit the best)
-Plastic tub and lid that you don't mind using to dye stuff in (it washes off the plastic quite easily)
-Plastic or latex gloves
Elmer's Blue Gel glue:
Rit Dye:
(clearly, this picture was taken at home...we don't get granite countertops in college!)
Now here's what you do:
1. Wet the white t-shirt with cool water, wring out, and stretch it over the top of a plastic container so it doesn't bunch up and something is between the layers of shirt.
2. Pick a favorite Bible verse, quote, song lyrics, picture, anything! Write it out or draw it on the t-shirt with the blue gel glue. I chose Jeremiah 29:11, my favorite Bible verse, and I wrote it on the shirt in cursive.
3. Allow the shirt to dry completely. I let it dry overnight because if I'm awake, I'm impatient.
4. Once dry, you can prepare the dye. There are specific instructions on the package, which I read, but I basically just filled a little plastic tub with cool water and poured some dye in until it looked pretty. For being a Chemistry major, I'm not very exact (thanks, mom!). The color of the dye bath is MUCH darker than the shirt will come out looking. Notice from the picture that my shirt is a pale purple, but my dye bath was a very deep purple.
This is the empty tub and some gloves. I highly recommend wearing gloves unless you want to walk around with oddly colored hands.
5. Soak the t-shirt in the dye. I believe the package said to let it soak for 15 minutes...I think I had it in there for less than that (again, not super patient!) At this point, you can see the resist of the image or writing you put on your shirt. I like immediate results :)
6. Let the shirt dry completely. This actually didn't take that long (woohoo!) so I proceeded to step 7 later that afternoon.
7. Rinse out the tub so that no dye is left. Fill with cool water and some hand soap. Soak the shirt in the soapy water for about 15 minutes in order to allow the dye to set. This also washes the rest of the glue out.
8. Wash and dry the shirt like any other shirt. Make sure you don't wash anything else with it at this point because you will still get dye coming out of the shirt.
Sorry there aren't more in-the-process pictures...I'm still learning to blog tutorials!
**Note: I haven't tried washing my shirt with any other shirts yet...I'm kind of afraid to because as much as I love the color, I don't want all my clothes becoming purple. If you're daring enough, go for it! I would recommend using a color catcher because those things are the bomb. Personally, I might just handwash my shirt to be on the safe side.
The finished product!
Project Review:
This project was AWESOME. It was simple, it took very little time (other than the drying time), and the materials were relatively cheap. Plus, it turned out super cute! I am very impressed with how well this turned out. I think it would work well regardless of skill level as well. I probably won't enjoy handwashing it all the time, but other than that I have no complaints. I highly recommend doing this project!!
Link to the website where I found the idea can be found here. It has great pictures and instructions as well.
____________________________________________________________________
"For I know the plans I have for you," declares the LORD, "plans to prosper you and not to harm you, plans to give you hope and a future." -Jeremiah 29:11
Pin It


Alyssa,
ReplyDeleteCame home from Amy's today and remembered the name of your blog (no easy feat for an old lady)! Love it! This is my favorite project because Jeremiah 29:11 is my favorite verse as well. Can hardly wait to try this project! Enjoyed meeting you today as well! Kathy
I'm so glad you like it! Your program at Drackett today was so much fun I really appreciate you coming in and showing us and it was so nice to meet you!
DeleteAlyssa